Appearance
Visualising Amazon Neptune with Ogma
Dataset
For this tutorial, we have used the twitter network data taken from Amazon example here. It is a small network of Twitter users, their tweets, follows and likes of each other's tweets. We will use Neptune to store the data, Gremlin to query it and Ogma to visualize it.
The architecture can be seen in the following diagram:
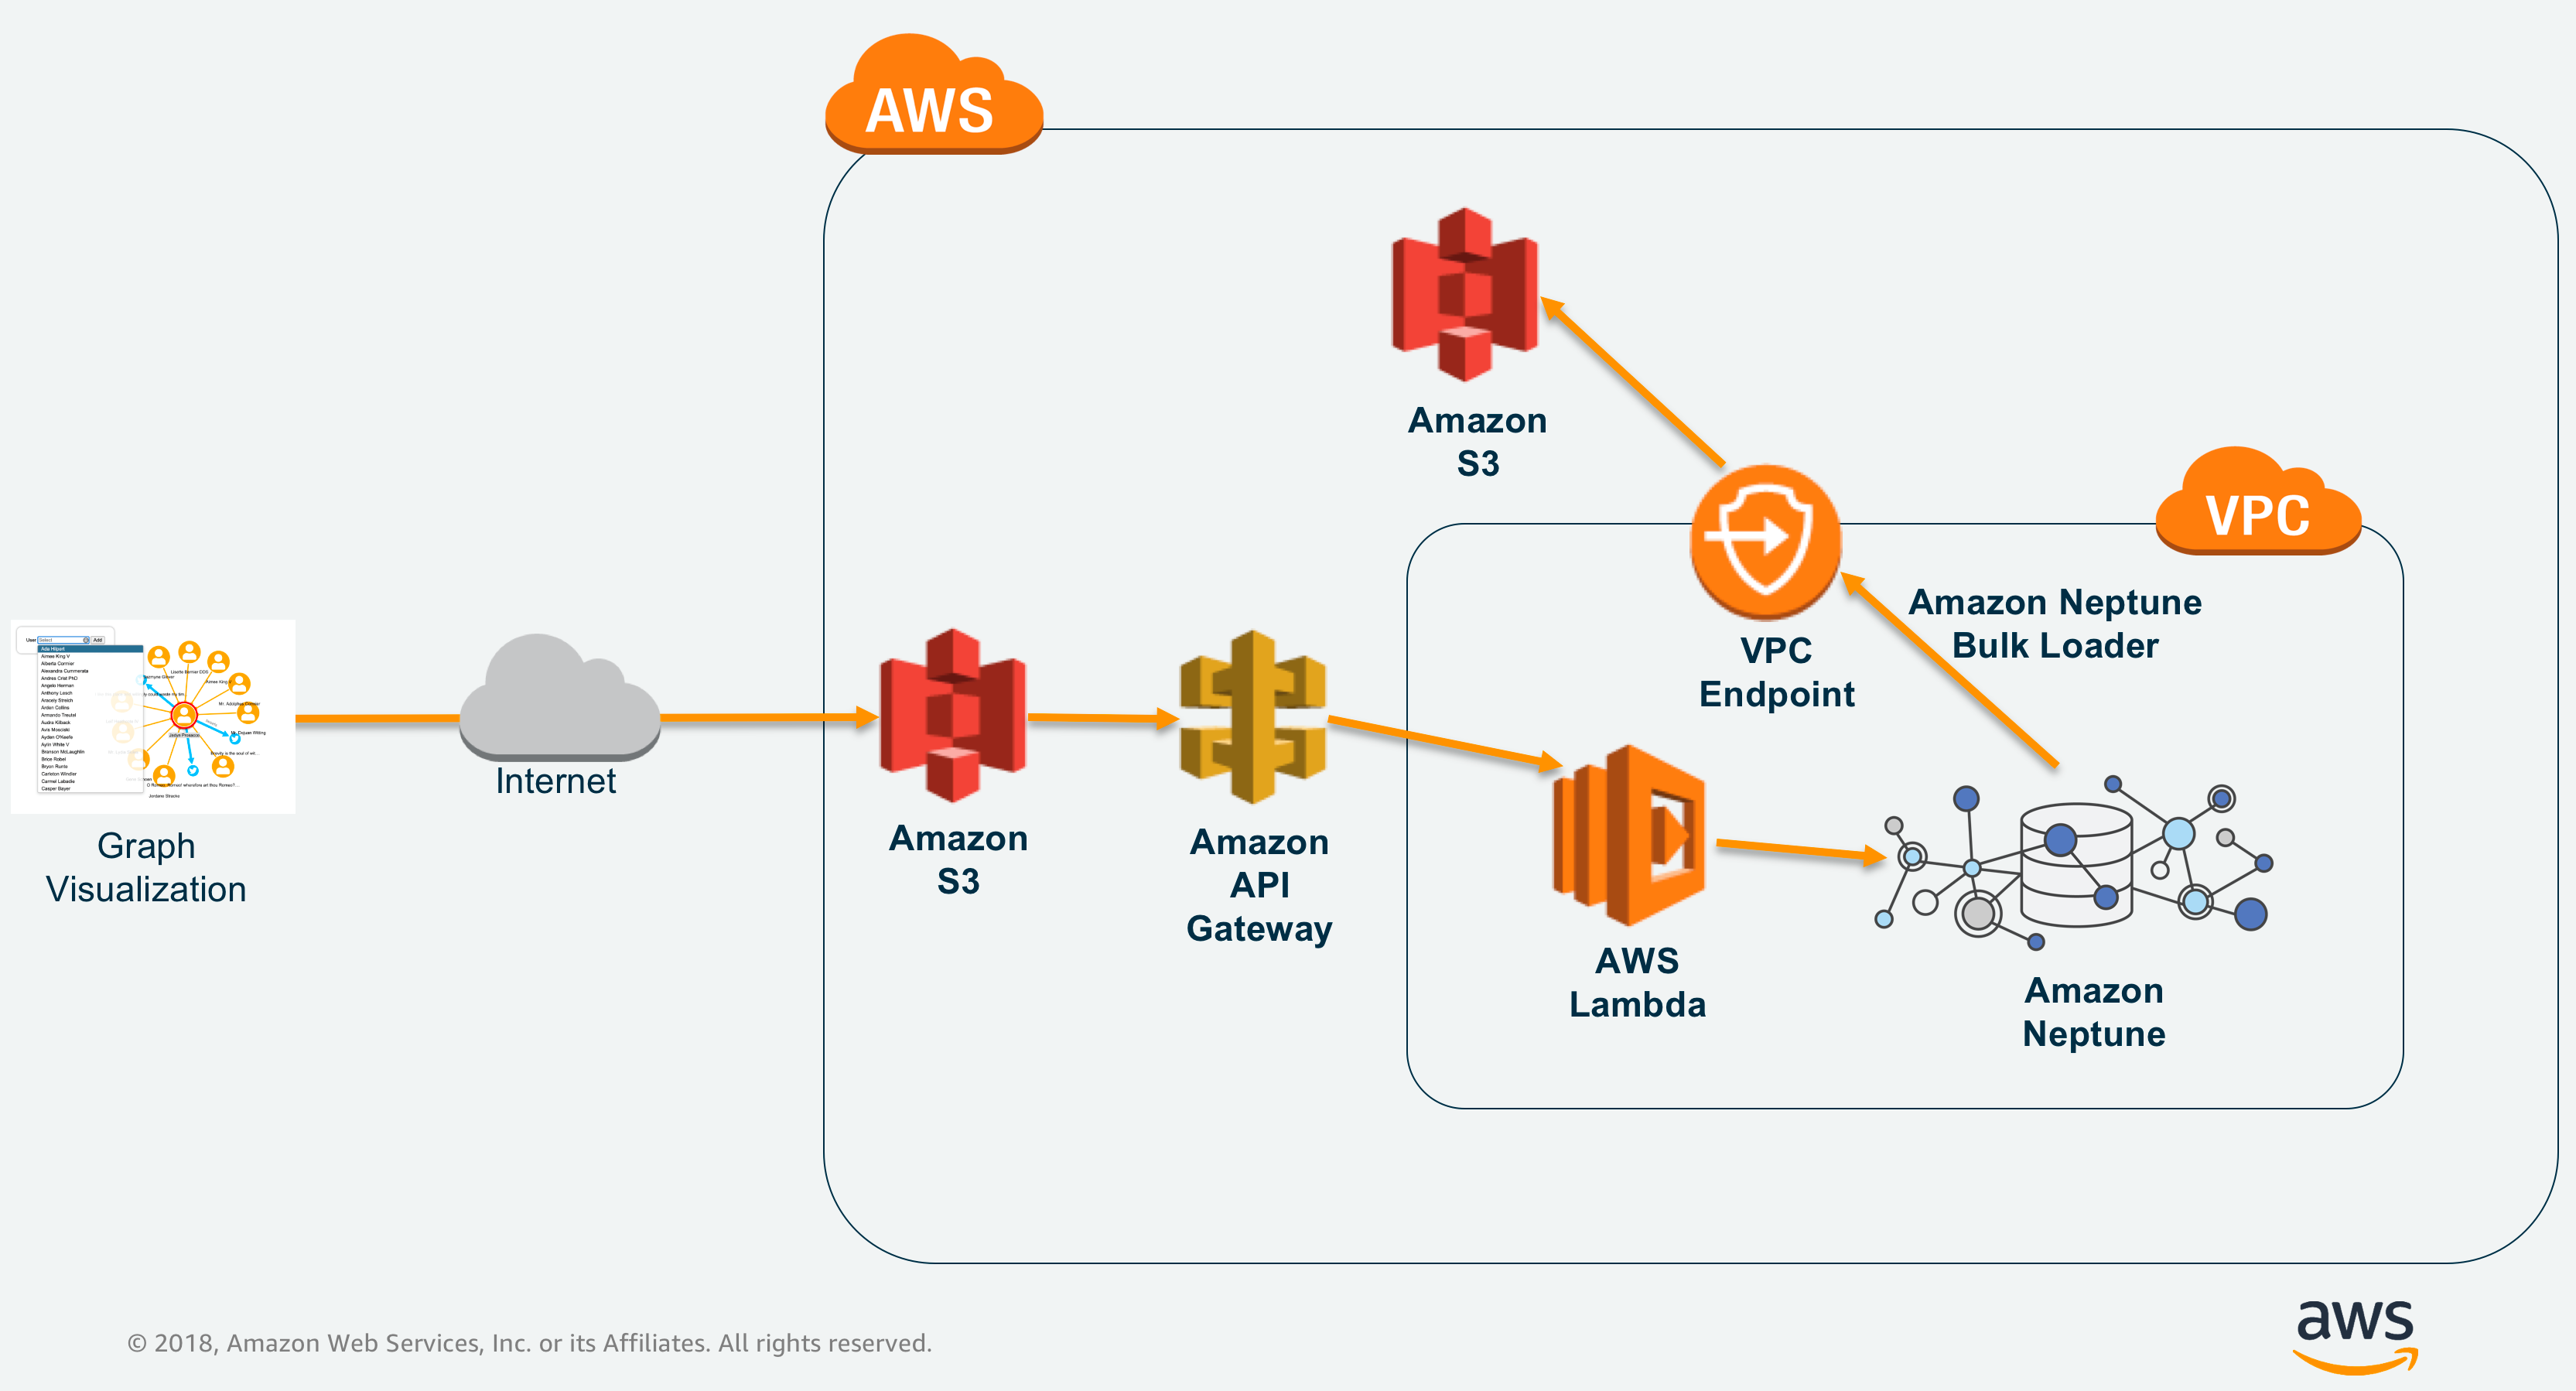
Load your data into Amazon Neptune
The steps to do that are covered in detail in the Amazon tutorial here. You will need to provision a new Amazon Neptune Instance inside a virtual private cloud.
The steps involved are:
- Provision Amazon Neptune Cluster
- Load sample data into Amazon Neptune
- Create and Configure AWS Lambda Function
- Create and Configure Amazon API Gateway - Proxy API
- Configure Amazon S3 bucket for hosting a static website
Build an API
Creating and deploying an Amazon Lambda function is described in the tutorial above, it covers the technical part of creating the API that would query the database and return the nodes. This part is required to connect your visualisation to the database, because it's a bad practice to expose your database connection and queries in a web application frontend. Let's take a look at the endpoints that we will expose. You can find the code such API in the ogma-neptune example.
Connecting to the Neptune DB using WebSockets and Gremlin driver:
js
exports.handler = async function (event) {
  const { DriverRemoteConnection } = gremlin.driver;
  const { Graph } = gremlin.structure;
  // Use wss:// for secure connections. See https://docs.aws.amazon.com/neptune/latest/userguide/access-graph-ssl.html
  const dc = new DriverRemoteConnection(
    `wss://${process.env.NEPTUNE_CLUSTER_ENDPOINT}:${process.env.NEPTUNE_PORT}/gremlin`,
    { mimeType: 'application/vnd.gremlin-v2.0+json' }
  );
...
After that, you can define the Gremlin traversals, that would provide the results for your API endpoints:
js
const graph = new Graph();
const traversal = graph.traversal().withRemote(dc);
const withTokens = '~tinkerpop.valueMap.tokens';

// getting user tweets by `userId`:
const data = await traversal
  .V()
  .has('User', '~id', userid)
  .out('Tweets')
  .limit(3)
  .valueMap()
  .with_(withTokens)
  .toList();
Or, getting the likes of a tweet by tweetId:
js
const data = await traversal
  .V()
  .has('Tweet', '~id', tweetid)
  .in_('Likes')
  .hasLabel('User')
  .limit(5)
  .valueMap()
  .with_(withTokens)
  .toList();
The resulting data has to be formatted and returned by the lambda function.
js
exports.handler = async function (event) {
  // connection
  ...
  // match the requested URL to route
  if (event.pathParameters.proxy.match(/your_api_endpoint/ig)) {
    // get the parameters from query string
    const { tweetId } = event.queryStringParameters;
    // run your Gremlin query and get the result
    const data = traversal.V()...
    // format and return the result
    return {
      statusCode: 200,
      headers: {
        'Access-Control-Allow-Origin': '*',
        'Access-Control-Allow-Methods': 'OPTIONS, GET',
        'Access-Control-Max-Age': 2592000, // 30 days
        'Access-Control-Allow-Headers': '*',
        'Content-Type': 'application/json'
      },
      body: JSON.stringify(data)
    };
  }
}
So now you have a working API that can be queried by your visualisation.
Connect API to Ogma
As you can see in the example on top of this page, in the api.js file we are creating an small wrapper layer to call the endpoints according to our intent.
js
// api.js
const API_URL = 'https://<your_lambda_API>.execute-api.<region>.amazonaws.com/test';

export function request(url) {
  return fetch(API_URL + url).then(r => r.json());
}
...

/**
 * @param {String} sourceNode
 * @returns {Promise<UserRecord[]>}
 */
export function getNeighbours(sourceNode) {
  return get(`/neighbours?id=${sourceNode}`);
}
Now you have a way to connect to your API endpoints and query the data, so we can move to the next step where we will use this API and Ogma to explore the results of the queries.
UI
As usual, we will start with creating the Ogma instance and show it on the screen.
js
import Ogma from '@linkurious/ogma';

const ogma = new Ogma({
  container: 'your_container_element_id'
});
Now we can start the visualisation. We would need to have distinct styles for our user nodes and the nodes representing tweets. We will use colors, sizes and icons to represent the different types of nodes. For the icons, we can use FontAwesome icon font, as described in our "Using icon fonts" tutorial. For the edges, we will use different colors.
Let's add the styles:
js
// Different styling for users and tweets (different icons)
ogma.styles.addRule({
  nodeAttributes: {
    radius: node => (node.getData('type') === NodeTypes.user ? 20 : 10),
    color: node => {
      const type = node.getData('type');
      if (type === NodeTypes.user) return '#ffa500';
      if (type === NodeTypes.tweet) return '#00bfff';
      return 'grey';
    },
    icon: {
      font: node => fontByType[node.getData('type')],
      content: node => iconByType[node.getData('type')],
      color: '#fff',
      minVisibleSize: 0
    }
  },
  // colors for different types of edges
  edgeAttributes: {
    color: edge => {
      const type = edge.getData('type');
      if (type === EdgeTypes.follows) return '#ffa500';
      if (type === EdgeTypes.tweets) return '#00bfff';
      if (type === EdgeTypes.likes) return RED;
      return 'grey';
    },
    text: {
      content: edge => edge.getData('type'),
      color: '#888'
    },
    // all edges are directed
    shape: 'arrow',
    // edge width will depend on the type of edge
    width: edge => {
      const type = edge.getData('type');
      if (type === EdgeTypes.follows) return 2;
      if (type === EdgeTypes.tweets) return 4;
      if (type === EdgeTypes.likes) return 5;
      return 1;
    }
  }
});
First we can add the furst nodes using search function:
js
// search users by name and add them to the visualisation
function addUser(username) {
  api
    .getUser(username)
    .then(data => {
      ogma.addNodes(
        // transform the data to Ogma format and keep the correct type
        data.map(({ id, name, label }) => {
          return {
            id,
            attributes: {
              text: name[0],
              color: 'red'
            },
            data: { type: label }
          };
        })
      );
    })
    // layout the graph and center on it
    .then(() => ogma.layouts.force())
    .then(() => ogma.view.locateGraph());
}
Our first user node is on the canvas:
Now, we add a function to expand the nodes using the API responses from Amazon Neptune.
js
// we will expand on double-click
ogma.events.on('doubleclick', ({ target }) => {
  // node is clicked
  if (!target || !target.isNode) return;

  const id = target.getId();
  // let's run the expand, using node id and type
  return expandNode(id, target.getData('type')).then(() =>
    ogma.layouts.force({ locate: true })
  );
});
In our expandNode function we will query the API and the followers of the user, as well as the user tweets. If the clicked node is of type Tweet, we will also create the LIKED edges.
js
function expandNode(id, type) {
  return getNeighbours(id)
    .then(() => getTweets(id))
    .then(() => {
      if (type === NodeTypes.tweet) return getLikes(id);
    });
}
Each of this data loaders receives the data from API and transforms it into nodes and edges. As a result, after clicking around the graph, you will see the following:
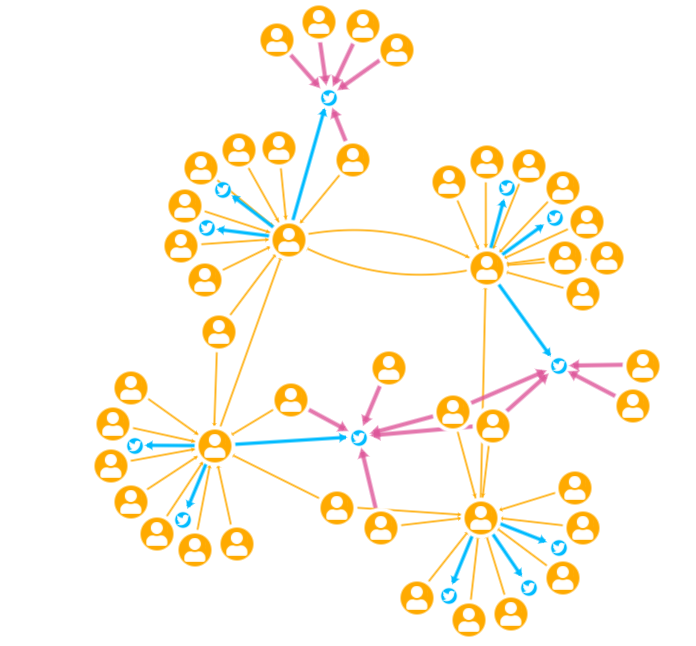
In the playground above how we have also added the searchbar UI to the example. With this being just a detail, you can see that we have built a visualisation with Ogma and Amazon Neptune using Gremlin to query the database.
Further reading
You can also use OpenCypher or SparQL to query the data. We have examples of using Cypher and SPARQL with Ogma, you can combine the code from these examples with what you have learned in this tutorial to build your own visualisation with Neptune.
The full code for this example can be downloaded at https://github.com/aws-samples/amazon-neptune-samples/tree/master/gremlin/ogma-neptune/.