Appearance
Integrating Ogma in Angular
The following tutorial will show how to create a Ogma component using the Angular framework. This tutorial is based on the Angular >15 framework version. You can find the boilerplate code in @linkurious/ogma-angular.
The final goal of this tutorial is to build a basic Angular web application with Ogma that:
- Add a node via a button
- Shows a tooltip with information when hovering a node
Bootstrap the application
Application is generated using the Angular CLI. To install it, run the following command:
bash
npm install -g @angular/cliThen, create a new Angular project:
bash
ng new ogma-angularYou may as well download the project files from the link on top of this tutorial.
Install Ogma
To install Ogma, run the following command:
bash
npm install https://get.linkurio.us/api/get/npm/ogma/<VERSION>/?secret=<YOUR_API_KEY> --saveYou need to copy that link from Linkurious download center. Your <API_KEY> and latest <VERSION> will be included in the link.
Create the Ogma service
In src/app/services/ogma.service.ts file, create the following service:
typescript
import { Injectable } from '@angular/core';
import Ogma from '@linkurious/ogma';

@Injectable({
  providedIn: 'root'
})
export class OgmaService {
  // expose an instance of Ogma from the service
  public ogma!: Ogma;

  public constructor() {
    console.log('ogma service constructor');
  }

  public initConfig(configuration = {}) {
    this.ogma = new Ogma(configuration);
  }

  public async addData(data: RawGraph) {
    await this.ogma.addGraph(data);
  }

  public runLayout() {
    return this.ogma.layouts.force({ locate: true });
  }
}
This service will be used to initialize Ogma and to add data to it. It also provides a layer of abstraction between Ogma and the rest of the application.
Note the part where we set up the service as a singleton using the providedIn: 'root' option. This means that the service will be instantiated only once and will be available to the whole application.
App component
In src/app/app.component.ts file, create the following component:
typescript
import {
  OnInit,
  AfterContentInit,
  Component,
  ViewChild,
  ElementRef
} from '@angular/core';
import { FormsModule } from '@angular/forms';
import { OgmaService } from './services/ogma.service';

@Component({
  selector: 'app-root',
  templateUrl: './app.component.html',
  styleUrls: ['./app.component.css'],
  standalone: true,
  providers: [OgmaService],
  imports: [FormsModule]
})
export class AppComponent implements OnInit, AfterContentInit {
  @ViewChild('ogmaContainer', { static: true })
  public container!: ElementRef<HTMLElement>;

  constructor(private ogmaService: OgmaService) {}
}
This component will be the root component of the application. It will be used to initialize Ogma canvas, add data to it and control the visualisation. We include the OgmaService as a provider to make it available to the component. FormsModule is also imported to allow the use of the form in the module template.
html
<div #ogmaContainer id="ogmaContainer"></div>
<div class="controls">
  Number of nodes: {{ countNodes() }}
  <form class="form" #formRef="ngForm">
    <h3>Action</h3>
    <button class="btn" (click)="addNode()">Add a node</button>
  </form>
</div>
Our component template is composed of a div that will contain the Ogma canvas and a form to add nodes to the graph. When the button is clicked, the addNode() method is called, which will create and add a randomly connected node to the graph and re-run the layout.
First, let's initialize the Ogma canvas in the ngOnInit() method:
typescript
  ...
  ngOnInit() {
    // pass the ogma instance configuration on init
    this.ogmaService.initConfig({
      options: {
        backgroundColor: 'rgb(240, 240, 240)'
      }
    });
    // setup more Ogma stuff here, like event listeners and more
  }
Now we can load the initial graph into the visualisation, that we can do in ngAfterContentInit method. Here we also add the style rules. It os recommended to add them before loading the graph to avoid unnecessary re-renders.
typescript
/**
* Ogma container must be set when content is initialized
*/
async ngAfterContentInit() {
const response = await fetch('assets/data.json');
const data = await response.json();
// attach the Ogma instance to the DOM
this.ogmaService.ogma.setContainer(this.container.nativeElement);
await this.ogmaService.addData(data);
await this.ogmaService.applyStyles({
nodeAttributes: {
color: node => {
const id = node
.getId()
.toString()
.replace(/[a-z]+/g, '');
return parseInt(id) % 2 === 0 ? 'purple' : 'orange';
}
}
});
return await this.ogmaService.runLayout();
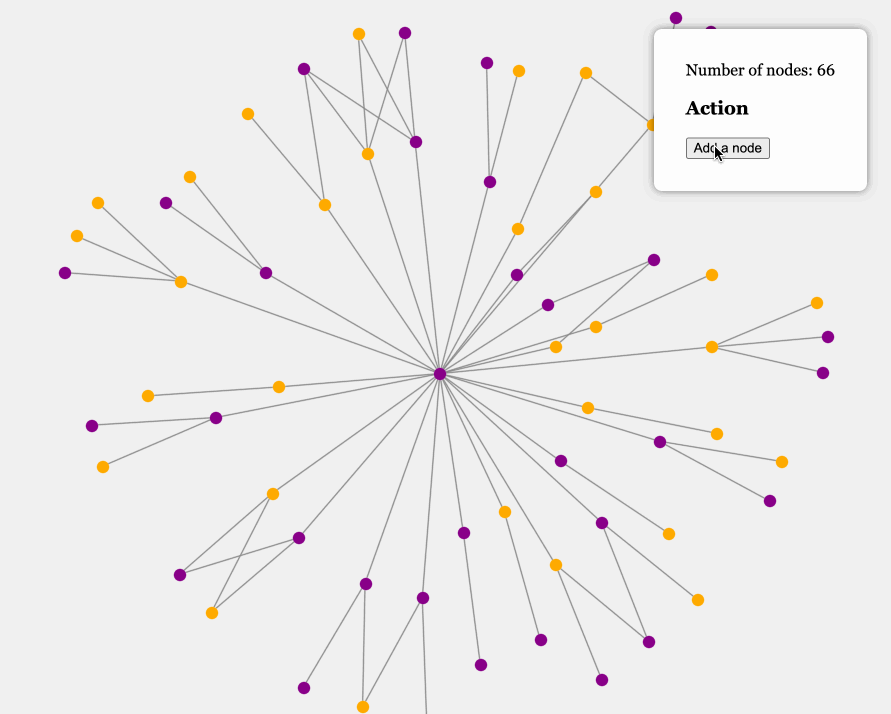
}Add a node
In addNode method, that is called by pressing a button in our form, we will interact with the service again, using utility functions to generate a RawNode and a RawEdge and add them to the graph. Note how we are respecting the asynchronous Ogma API and calling the layout after the data is added.
typescript
public async addNode() {
  const node = createNode(this.countNodes());
  const existingNodes = this.ogmaService.getNodes();
  const randomId = existingNodes
    .get(Math.floor(Math.random() * existingNodes.size))
    .getId();
  const edge = createEdge(node.id!, randomId);

  // add it to the graph as a subgraph and run layout
  await this.ogmaService.addData({ nodes: [node], edges: [edge] });
  await this.ogmaService.runLayout();
}
Result
The final result should look like this:
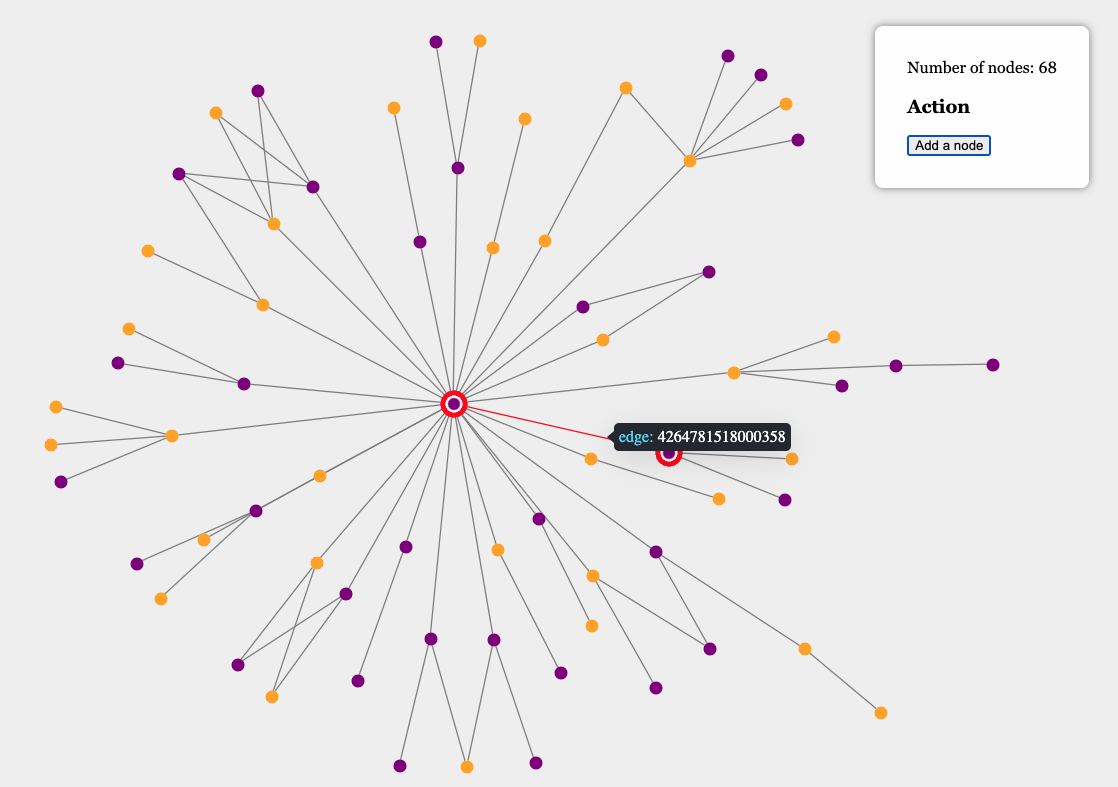
Adding tooltip plugin
It's useful to consider how to add a moving tooltip to the application to illustrate how you can encapsulate the things that don't really fit into Angular realm, into a component.
The code for the tooltip plugin that is used in this tutorial can be found here. You don't have to use it this way, in fact, you can re-implement it differently, moving this logic higher up to the Angular level, like we did in the Angular-9 tutorial. But here we will show how to encapsulate the existing plugin into a component to save time.
First, we will copy the code from the example into src/app/components/tooltip.plugin.ts and create a component that will be used to initialize the tooltip. In src/app/components/tooltip/tooltip.component.ts file, create the following component:
typescript
import { Tooltip } from './tootlip.plugin';
import { OgmaService } from './services/ogma.service';
import { Component, OnInit, ViewEncapsulation } from '@angular/core';

@Component({
  selector: 'tooltip',
  template: '',
  styleUrls: ['./tooltip.component.css'],
  standalone: true,
  encapsulation: ViewEncapsulation.None
})
export class TooltipComponent implements OnInit {
  private tooltip!: Tooltip;
  constructor(private ogmaService: OgmaService) {}
  ngOnInit() {
    // add the tooltip plugin
    this.tooltip = new Tooltip(this.ogmaService.ogma, {
      placement: 'right',
      // here you can use your HTML templates
      content: ogma => {
        const { target } = ogma.getPointerInformation();
        if (target)
          return `${
            target.isNode ? 'node' : 'edge'
          }: <span class="info">${target.getId()}</span>`;
        return '';
      }
    });
  }
}
It has no html template, as it will be rendered by the plugin itself, but we will need some CSS to style it. We will put the plugin CSS code into src/app/components/tooltip/tooltip.component.css file and make sure that it's not namespaced, as it will be used in the Ogma container. For that we will add settings to the component decorator:
typescript
@Component({
  selector: 'tooltip',
  template: '',
  standalone: true,
  // disable CSS namespacing
  encapsulation: ViewEncapsulation.None,
})
The tooltip initialization is borrowed completely from the example, so we don't need to cover that, we'll just say that it needs to hook itself to the ogma instance from the OgmaService. For that, by the way we will need to adjust the OgmaService to make it a singleton, so that we can access it from the component.
typescript
@Injectable({
  providedIn: 'root',
})
export class OgmaService {
Now in the AppComponent we can add the tooltip component to the template:
html
<tooltip />And include our component in the app module:
typescript
@Component({
  selector: 'app-root',
  templateUrl: './app.component.html',
  styleUrls: ['./app.component.css'],
  standalone: true,
  providers: [OgmaService],
  imports: [FormsModule, TooltipComponent]
})
That's it! Now you can see the tooltip in action: